今回達成すること
Contentful APIリクエストを行うFunctionsプロジェクトを作成し、検索機能を完成させます。
記事の最後にはデプロイを行い、本番環境の挙動を確認します。

検索ページの実装を行う
検索ページに投げられたクエリを取得し、Netlify FunctionsにAPIリクエストを投げるよう設定します。
pages/search.vue
<template>
  <v-container>
    <ui-page-title
      :title="pageTitle"
      :sub-title="pageSubTitle"
    />

    <ol>
      <li
        v-for="(post, i) in posts"
        :key="`post-${i}`"
      >
        {{ post.fields.title }}
      </li>
    </ol>
  </v-container>
</template>

<script lang="ts">
import { Component, Vue } from 'nuxt-property-decorator'
import { BlogPost } from '~/store/types'

@Component
export default class SearchPage extends Vue {
  layout (): string {
    return 'app'
  }

  pageTitle: string = this.$my.routePageTitle(this.$route.name)
  posts: BlogPost[] = []

  /*
    string型 && 空白ではない場合、クエリの値を返す
    '/search?q=%20'の場合、クエリは空白のstring型と判定されるので空白の場合はfalseを返すようtest()で判定
  */
  get q (): false | string {
    const q: string | (string | null)[] = this.$route.query.q
    return (typeof q === 'string') && (!/^\s+$/.test(q)) && q
  }

  // 検索件数
  get pageSubTitle (): string {
    return (this.q)
      ? `${this.q} の検索結果 ${this.posts.length}件`
      : '検索キーワードを入力してください'
  }

  // postのコンテンツタイプ名を返す
  get postContentType (): string {
    return this.$accessor.post.content.type.post
  }

  /*
    Nuxt ssr & staticの挙動
    asyncData()はgenerateコマンド時に実行され本番環境では稼働しない
    そこでページ内で再実行可能なcreated()でAPIリクエストを行う
  */
  async created (): Promise<void> {
    // 検索APIリクエスト
    // await this.getContentful()
  }

  // Netlify FuncrionsからContentfulにAPIリクエストを行う
  async getContentful (): Promise<void> {
    // クエリが存在する場合
    if (this.q) {
      await this.$axios.$post(
        '/.netlify/functions/search-contentful',
        {
          contentType: this.postContentType,
          query: this.q
        }
      )
        .then(({ items }: { items: BlogPost[] }) =>
          (this.posts = items)
        )
    }
  }
}
</script>
-
get q ()... クエリ文字、もしくはfalseを返す。$route.query.q... NuxtではURLのクエリを$route.query.<プロパティ名>で取得できる。&&... 左辺がtrueの場合、右辺を実行。 全てがtrueを返す場合、最後の右辺のクエリ文字を返す。
-
get postContentType ()... 下記記事のpost/index.ts で用意したコンテンツタイプの文字列を取得。 -
getContentful ()... Netlify FunctionsにAPIを投げるメソッド。
created()内でAPIリクエストを行う理由
ssr: true, target: 'static'モードの場合、本番環境のasyncData()はgenerateコマンド時に実行され、それ以後は実行されません。
なので、created()内でFunctionsにリクエストを行わないと、検索機能が正常に動きません。
注意していただきたいのは、開発環境のasyncData()はサーバーでもクライアントでも実行されます。
デプロイした時に何故か動かなくなるエラーにはまるので、NuxtのモードでasyncData()の挙動は変わると覚えておきましょう。
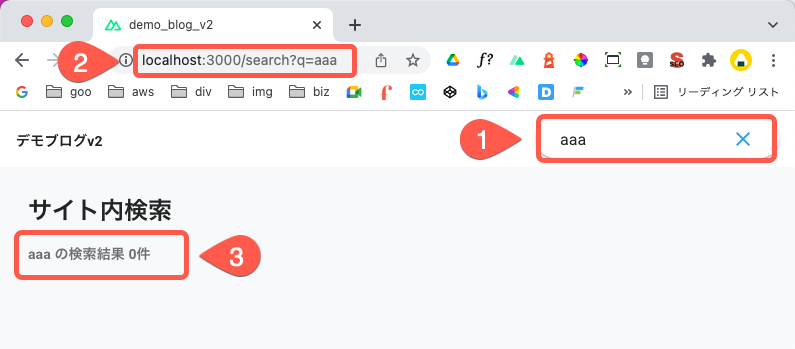
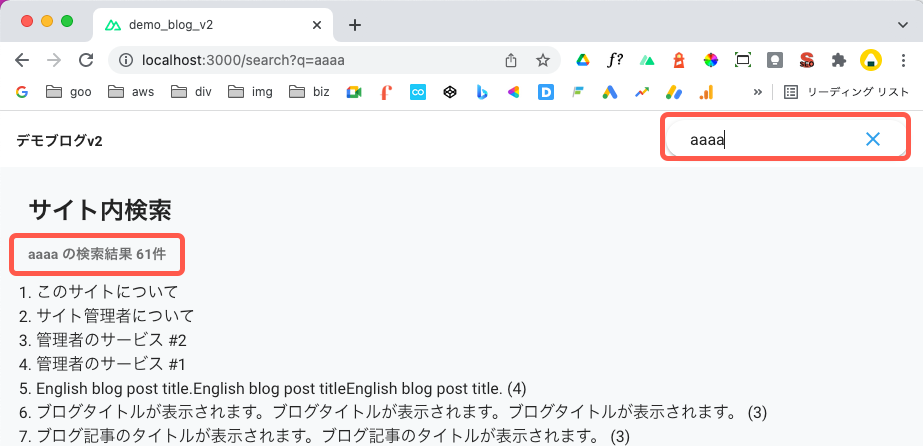
検索フォームからページ遷移してみよう
検索フォームから検索ページへ遷移してみましょう。
- フォームの値が
- URLのクエリ
?=aaaになり - 検索結果に表示されました。
ContentfulにリクエストするFunctionsを作成する
ContentfulにAPIリクエストを行うFunctionsプロジェクトを作成しましょう。
プロジェクト名はsearch-contentfulとします。
% yarn functions:create search-contentful

# 以下を選択
❯ TypeScript
❯ [hello-world] Basic function that shows async/await usage, and response formatting

...
✔ Installed dependencies for search-contentful
✨  Done in 26.19s.
パラメーターがない場合のレスポンスメソッドを追加する
noRequestBody()を追加します。
リクエストに検索クエリが付与されていない場合、400のレスポンスを返すメソッドです。
netlify/lib/http-request-handler.ts
export default class HttpRequestHandler {
  ...
  // 追加
  // リクエストのパラメータが存在しない場合のレスポンス
  // statusCode Doc: https://docs.commercetools.com/api/errors
  noRequestBody () {
    return {
      statusCode: 400,
      body: 'No request body'
    }
  }
}
Conetentful APIにリクエストを行う
プラグインファイルの
netlify/functions/search-contentful/search-contentful.ts
import { Handler, HandlerEvent, HandlerContext } from '@netlify/functions'
import { BlogCategory, BlogPost, BlogTag } from '~/store/types'

import lib from '~/netlify/lib'
import client from '~/plugins/contentful'

type Item = BlogCategory | BlogPost | BlogTag
interface RequestBody {
  contentType: string
  query: string
}

export const handler: Handler = async (event: HandlerEvent, _context: HandlerContext) => {
  const requestOrigin: string | undefined = event.headers.origin

  // CORS対応
  if (event.httpMethod === 'OPTIONS') {
    return lib.httpRequest.checkCors(requestOrigin)
  // Not POST 対応
  } else if (event.httpMethod !== 'POST') {
    return lib.httpRequest.notAllowedRequestMethod()
  // event.body: null 対応
  } else if (!event.body) {
    return lib.httpRequest.noRequestBody()
  }

  const headers = lib.httpRequest.corsHeaders(requestOrigin)

  let items: Item[] = []
  const requestBody: RequestBody = JSON.parse(event.body)

  /*
    await client.getEntries({}).catch()でエラーを取得すると、catchを通過し200が返ってしまう。
    そこでtry, catchでエラーを取得しcatch内で処理を止める。
  */
  try {
    console.log('requestBody:', requestBody)

    await client.getEntries({
      content_type: requestBody.contentType,
      query: requestBody.query
      /*
        公開日降順で取得したコンテンツを並び替える場合
        default: item.sys.updatedAtの降順
      */
      // order: '-fields.publishDate'
    })
      .then((entry: { items: Item[] }) =>
        (items = entry.items)
      )
  } catch (error: any) {
    const e: any = JSON.parse(error.message)
    // Functionsのログ出力用
    console.log('Error:', e)
    console.log('StatusCode:', e.status)
    console.log('StatusText:', e.statusText)
    console.log('ErrorDetails:', e.details.errors)

    return {
      statusCode: e.status
    }
  }

  return {
    statusCode: 200,
    headers,
    body: JSON.stringify({
      items
    })
  }
}
else if (!event.body) { ... }...event.bodyにはaxiosから投げられた検索キーワードが入っている。値が存在しない場合はnoRequestBody()メソッドで400エラーを返す。JSON.parse(event.body)...contentTypeとqueryプロパティを取得するために、オブジェクトに変換。client.getEntries({})query... Contentfulリクエスト時にqueryプロパティを付与すると、content_typeで指定したモデルから、キーワードが一致するコンテンツを検索する。order... コンテンツの並び替えを行う場合に使用。Contentfulのデフォルトは、更新順に並び替えられる。
上記の実装で、Contentful APIが検索キーワードに一致するコンテンツを検索し、items配列に返してくれます。
try, catchでエラー処理を行う理由
await client.getEntries({})でエラーをキャッチすると、処理が終了せずに通過し、200のレスポンスが返ってきます。
// NG
await client.getEntries({
  content_type: requestBody.contentType,
  query: requestBody.query
})
  .then((entry: { items: Item[] }) =>
    (items = entry.items)
  )
  .catch((error: any) => {
    const e: any = JSON.parse(error.message)
    // ここのreturnを通過してしまう
    return {
      statusCode: e.status
    }
  })
try, catch 構文でreturnを返すと、そこで処理が終了し、エラーのステータスコードを正しく返します。
// OK
try {
  ...
} catch (error: any) {
  const e: any = JSON.parse(error.message)
  console.log('Error:', e)
  console.log('StatusCode:', e.status)
  console.log('StatusText:', e.statusText)
  console.log('ErrorDetails:', e.details.errors)

  // ここで処理が止まる
  return {
    statusCode: e.status
  }
}
FunctionsからContentfulへAPIリクエストを行おう
created()メソッドの内のコメントアウトを外します。
pages/search.vue
@Component
export default class SearchPage extends Vue {
  ...
  async created (): Promise<void> {
    // 検索APIリクエスト
    await this.getContentful()
  }
}
Functionsサーバーを起動し、
% yarn functions:dev
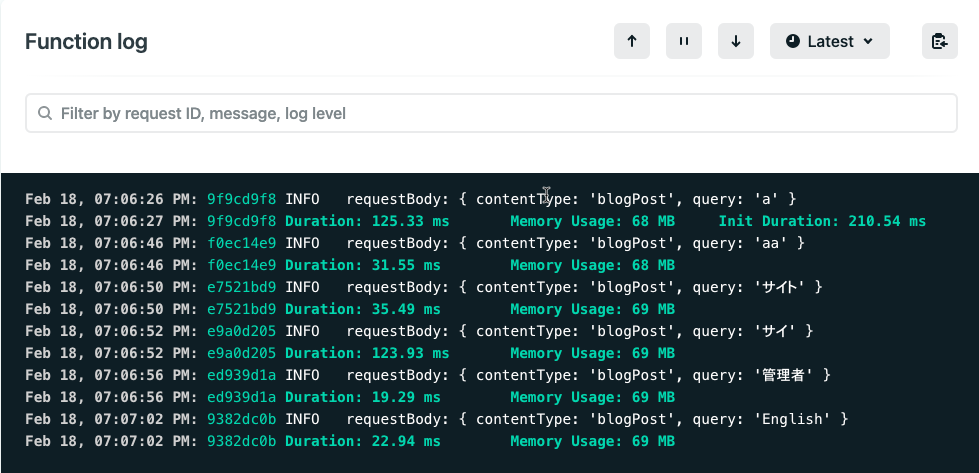
クエリに「a」を付けた下記URLに直接アクセスしてみましょう。
http://localhost:3000/search?q=a
現状、検索フォームからのリクエストは最初の1回以降動きません。
記事タイトルが表示されました。
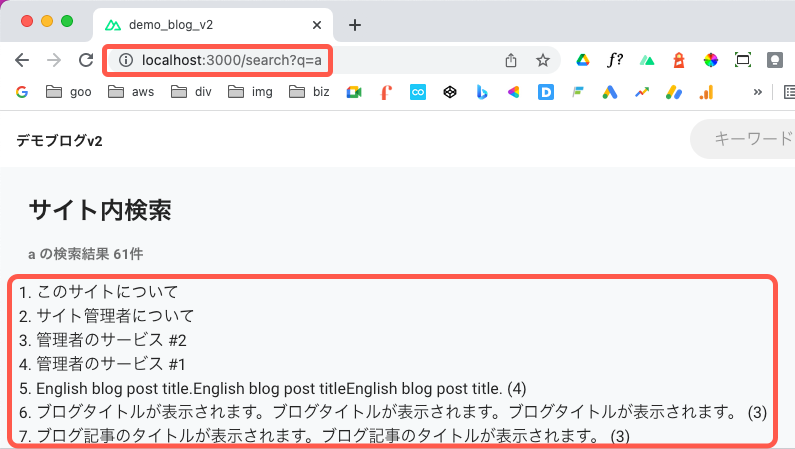
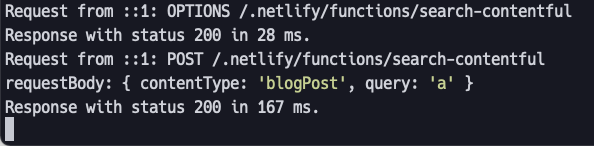
Functionsサーバーを確認すると、クエリが正しく投げられていますね。
ステータスコードも200が返ってきています。
Functionsのエラーログを確認しよう
続いてエラーの挙動を確認します。
Contentfulのcontent_typeプロパティに+ 'a'を追加し、不正なコンテンツタイプを指定します。
netlify/functions/search-contentful/search-contentful.ts
...
export const handler: Handler = async (event: HandlerEvent, _context: HandlerContext) => {
 ...
  try {
    await client.getEntries({
      // + 'a'を追加
      content_type: requestBody.contentType + 'a',
      ...
    })
  } ...
}
ブラウザから、同じURLをリロードしてください。
Nuxt上ではネットワークエラーが発生し、Functionsサーバーにはエラーログが出力されます。
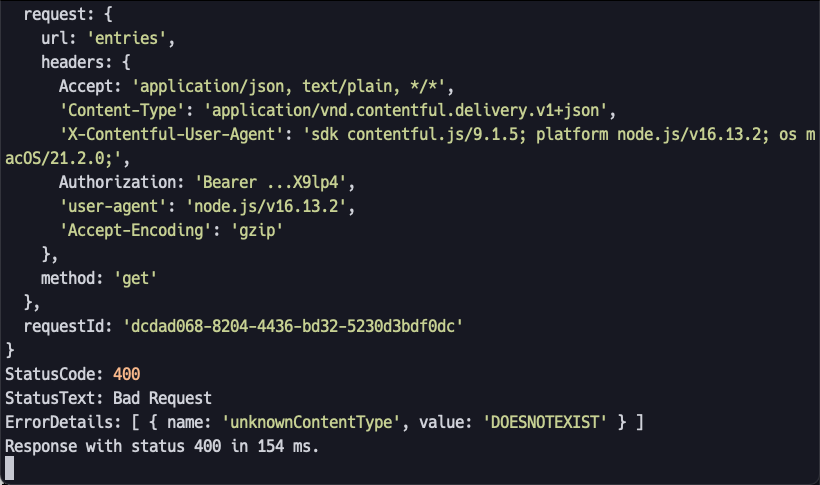
ステータスコードは400が返ってきていますね。
エラーを通過せずに、処理が止まっていることが確認できました。
Contentfulのエラーレスポンスの詳細
Contentfulが返す具体的なエラーの内容はe.details.errorsに入っています。
console.log('ErrorDetails:', e.details.errors)

=> ErrorDetails: [ { name: 'unknownContentType', value: 'DOESNOTEXIST' } ]
nameに「不明なコンテンツタイプ」と出力されていますね。
今後エラーを解決する場合はe.details.errorsを確認してください。
エラー発生コードを正常に戻す
確認が取れたらエラー発生コードは元に戻します。
netlify/functions/search-contentful/search-contentful.ts
...
export const handler: Handler = async (event: HandlerEvent, _context: HandlerContext) => {
 ...
  try {
    await client.getEntries({
      // 元に戻す
      content_type: requestBody.contentType,
      ...
    })
  } ...
}
以上でContentfulへの検索APIリクエストの実装は完了です。
検索フォームのAPIリクエスト時に再レンダリングを行う
現在のままでは、一度検索を行った後に再度フォームに値を入力しても検索結果が変わりません。
Nuxtのデフォルトの挙動は、URLのクエリが変わっただけではページの再レンダリングを行いません。
そこで、クエリの変化とともにページコンポーネントの再レンダリングを行うkey()メソッドを追加します。
pages/search.vue
@Component
export default class SearchPage extends Vue {
  layout (): string {
    return 'app'
  }

  // 追加
  /*
    returnの値が変化した場合にページコンポーネントを再レンダリングする
    Doc: https://nuxtjs.org/docs/components-glossary/key
  */
  key (route: { fullPath: string }): string {
    return route.fullPath
  }
  ...
}
route.fullPath... ここにはクエリも含むパスが入っているので、クエリの変化とともに再レンダリングが実行される。
これで検索フォームの値が変化すると検索APIが実行されるようになりました。
検索フォームの値を初期化する
検索フォームに値を入力したままページ遷移すると値が残っていまいます。
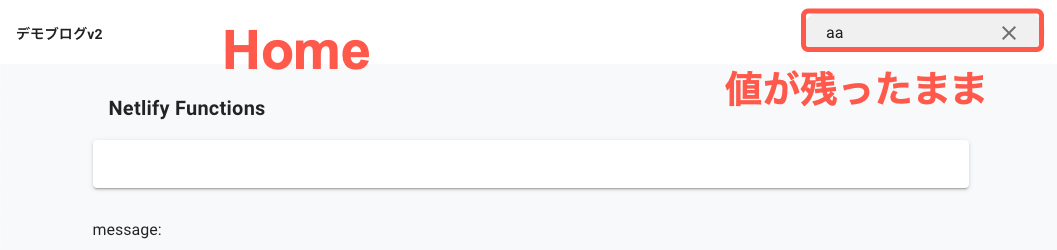
そこで、検索ページから離れたタイミングでフォームの値を初期化します。
検索ページから離れたタイミングを検知するには、VueRouterのbeforeRouteLeave()メソッドを使用します。
pages/search.vue
@Component
export default class SearchPage extends Vue {
  ...
  async created (): Promise<void> {
    ...
  }

  // 追加
  /*
    コンポーネントを描画するルートがナビゲーションから離れる直前に呼ばれる
    thisでインスタンスにアクセス可能
    Doc: https://router.vuejs.org/guide/advanced/navigation-guards.html#using-the-options-api
  */
  beforeRouteLeave (_to: any, _from: any, next: any) {
    // ページ遷移前にQueryを初期化する
    this.$accessor.getSearchQuery('')
    return next()
  }
  ...
}
これでページ遷移とともに、検索フォームの値が初期化されるようになりました。
ページ遷移を検知するVueRouterメソッド
beforeRouteLeaveの他にも、ページ遷移前後で発火するメソッドがVueRouterには用意されています。
-
beforeRouteEnter... ルート遷移直前。thisへのアクセス不可。 -
beforeRouteUpdate... ルート変更直後。thisへのアクセス可。
本番環境にデプロイしよう
Functionsプロジェクトのsearch-contentfulでは、プラグインファイルの
このファイルにはCOntentful API Keyの環境変数が使用されているため、本番環境のサーバーにも同じ値を登録しなければなりません。
本番環境で使用するAPI Keyは
CTF_SPACE_IDとCTF_DELIVERY_API_KEYの2つです。
netlify env:setコマンドで環境変数を登録しましょう。
% yarn netlify env:set CTF_SPACE_ID <space id>
% yarn netlify env:set CTF_DELIVERY_API_KEY <delivery api key>
netlify env:listで本番環境のサーバーに登録した環境変数一覧が確認できます。
% yarn netlify env:list

.--------------------------------------------------------------------.
|                       Environment variables                        |
|--------------------------------------------------------------------|
|         Key          |                    Value                    |
|----------------------|---------------------------------------------|
| API_URL              | https://demo-blog-v2.netlify.app            |
| CTF_SPACE_ID         | <space id>                                  |
| CTF_DELIVERY_API_KEY | <delivery api key>                          |
'--------------------------------------------------------------------'
Functionsプロジェクトをデプロイし、本番環境の挙動も確認しましょう。
% yarn functions:deploy
ちゃんと動きましたね。
Netlifyの「functions」メニューから該当のプロジェクトログを確認すると、ログが取れているのがわかります。エラーなく動きました。
今回の作業は以上です。
% git add -A
% git commit -m "Add search-contentful for Functions project" -m "Finished contentful API request for search page"
まとめと次回
今回は検索機能の実装を行い、本番環境の動作確認を行いました。
それでは次回は、検索結果を分割表示する実装を行います。