今回達成すること
これまで
これまでサーバーからShopifyにAPIリクエストを行い、商品一覧を取得する実装を行いました。
これから
この記事では、これまでの実装を一から作り直し、よりベストな方法でShopify APIへのリクエストを行います。
具体的には以下の通りです。
- Shopify APIの初期化
- サーバーサイドプラグイン作成
- APIリクエストで商品一覧取得
- Piniaを導入しストアに商品一覧を保存
- 商品コンテンツページはストアから商品を検索する
この5つの実装を行うことで、APIリクエストの回数を減らしページ遷移が高速化します。
前提条件
-
Shopifyに会員登録し、アクセストークンを取得してください。
アクセストークンの取得はこちらの記事で解説しています。
-
nuxt-shopifyのインストールを済ましてください。
% yarn add nuxt-shopify
nuxt-shopifyのセットアップを済ましてください。
tsconfig.json
{
  "compilerOptions": {
    "types": [
      "nuxt-shopify"
    ]
  }
}
.env
SHOPIFY_DOMAIN=<ショップドメイン>.myshopify.com
SHOPIFY_ACCESS_TOKEN=<アクセストークン>
shopify-buyの初期化
Shopify APIに使用するのはnuxt-shopifyにラップされている、shopify-buyというShopifyの公式モジュールです。
「plugins/shopify」ディレクトリにshopify-buyを初期化します。
plugins/sopify/client.ts
// read server only
import Client from 'shopify-buy'

/*
  store内でimportしたときクライアントでも読み込まれるのでenv.プロパティがないエラーが発生する
  回避策としてサーバーのみenv.プロパティを読み込むようにする
 */
const client = Client.buildClient({
  domain: (process.server) && process.env.SHOPIFY_DOMAIN,
  storefrontAccessToken: (process.server) && process.env.SHOPIFY_ACCESS_TOKEN,
  language: 'ja-JP'
})

export default client
環境変数が存在しないエラーへの対応
今回は「store」ディレクトリ以下のPiniaからclientを呼び出します。
「store」ディレクトリはクライアントサイドでも読み込まれるので、サーバーに登録した環境変数が無いよといったエラーが発生します。
このエラーの回避策として、
- プロセスがサーバーの場合 =>
(process.server) && - 環境変数を読み込む =>
process.env.SHOPIFY_DOMAIN
設定をおこなっています。
Shopifyの型を追加登録する
上記#前提条件でインストールしたnuxt-shopifyには、全てのプロパティの型が用意されていません。
そこで、登録されていない型を自前で用意する必要があります。
「types」ディレクトリ以下に
types/shopify.ts
// type: node_modules/@types/shopify-buy/index.d.ts
import type { Product, Image } from 'shopify-buy'

// デフォルトの型に無いプロパティを追加
interface CustomImage extends Image {
  width: number
  height: number
}

export interface CustomProduct extends Product {
  descriptionHtml: string
  images: Array<CustomImage>
}
このファイルに必要な型をどんどん追加します。
Checkout IDへのリダイレクト処理
Checkout IDの詳細はこちらの記事をご覧ください。
Shopifyの機能には、カートの状況を保存するCheckout IDが用意されています。
このCheckout IDをURLクエリに添付し、Nuxtをリロードしてもカートの中身が保持できる仕様にします。
ユーザーがサイト訪問の処理
- Checkout IDがない場合
- Checkout IDの発行
- クエリに添付
- リダイレクト
- Checkout IDがある場合
- 何もしない
「plugins/shopify」ディレクトリ以下に
plugins/shopify/redirect-checkout-query.ts
import client from '~/plugins/shopify/client'
import Url from 'url'

type CheckoutId = string | number | string[]

export const redirectCheckoutQuery = async (nuxtApp) => {
  console.log('plugins/redirect-checkout-query.ts')

  const url = Url.parse(nuxtApp.ssrContext.req.url, true)
  let checkoutId: CheckoutId = url.query.checkoutId

  console.log('checkoutId-1', checkoutId)

  // checkoutIdが存在する場合は処理を終了する
  if (checkoutId) {
    return
  }

  const pathname: string = url.pathname

  await client.checkout.create()
    .then(checkout => (checkoutId = checkout.id))

  console.log('checkoutId-2', checkoutId)

  nuxtApp.$router.replace({
    path: pathname,
    query: { checkoutId }
  })
}
Nuxt3のプラグインファイルの自動インポート機能
Nuxt3から、pluginsプロパティが無くなりました。
変わりに「plugins」ディレクトリの以下のファイルは、自動で読み込まれるようになります。
登録されているファイル
プラグインとして登録されるのは、ディレクトリの最上位にあるplugins/ファイル(またはサブディレクトリ内のインデックスファイル)のみです。下記構成の場合、
myPlugin.tsとだけmyOtherPlugin/index.tsが登録されます。plugins | - myPlugin.ts | - myOtherPlugin | --- supportingFile.ts | --- componentToRegister.vue | --- index.ts
Piniaを導入する
Nuxt3からVuexが必須ではなくなりました。
そこで状態管理にはVuex4、もしくはPiniaを導入するのが一般的です。
PiniaはVuexのmitationsが無くなり、よりシンプルに直感的に記述できるのが特徴です。
Vue3のドキュメントでも推奨されています。
既存のユーザーは、Vueの以前の公式の状態管理ライブラリであるVuexに精通している可能性があります。Piniaがエコシステムで同じ役割を果たしているため、Vuexは現在メンテナンスモードになっています。それはまだ機能しますが、新しい機能を受け取ることはもうありません。新しいアプリケーションにはPiniaを使用することをお勧めします。
Piniaのインストールとセットアップ
Nuxt3でPiniaを導入するには、piniaと@pinia/nuxtをインストールします。
% yarn add pinia @pinia/nuxt
セットアップには、buildModuleに@pinia/nuxtを登録します。
nuxt.config.ts
import { defineNuxtConfig } from 'nuxt3'

export default defineNuxtConfig({
  buildModules: [
    // https://pinia.vuejs.org/ssr/nuxt.html
    '@pinia/nuxt'
  ]
})
これでPiniaが使用できるようになりました。
PiniaからShopify APIへリクエストを送る
「store/shopify」以下に
Shopifyが用意しているfetchAll()メソッドで商品一覧を取得します。
store/shopify/index.ts
// https://pinia.vuejs.org/core-concepts/
import type { CustomProduct }  from '~/types/shopify'

import { defineStore } from 'pinia'
import client from '~/plugins/shopify/client'

export const useShopifyStore = defineStore({
  id: 'shopify-store',

  state: () => {
    return {
      products: [] as CustomProduct[]
    }
  },

  actions: {
    // 商品一覧の取得(server only)
    async serverOnGetProducts () {
      console.log('store/shopify/serverOnGetProducts()')

      await client.product.fetchAll()
        .then((response: CustomProduct[]) =>
          (this.products = this.graphModelToObject(response))
        )
    },

    /*
      Shopify APIはGraphModelが返ってくるのでstringifyでJSONに展開しparseでJSオブジェクトに戻す
      GraphModel: 応答データを逆シリアル化するときに使用される基本クラス
      https://shopify.github.io/graphql-js-client/GraphModel.html
     */
    graphModelToObject (response) {
      return JSON.parse(JSON.stringify(response))
    }

  }
})
Piniaの宣言方法
defineStoreをインポートし、
import { defineStore } from 'pinia'
その中にstate、getters、actionsを作成します。
export const useShopifyStore = defineStore({
  id: 'id',

  state: () => {},

  getters: {},

  actions: {}
})
ファイル内の関数や変数にはthisでアクセスします。
async serverOnGetProducts () {
  this.products = this.graphModelToObject(response)
}
Piniaの呼び出し方
エクスポートした変数名から、
export const useShopifyStore = defineStore({})
変数や関数にアクセスできます。
pages/products/index.vue
<script setup lang="ts">
  import { useShopifyStore } from '~/store/shopify'
  const products = useShopifyStore().products
</script>
サーバー初期化プラグインの作成
今回のアプリでは、サーバーサイドで
- Checkout IDへのリダイレクト
- Shopifyの商品取得
を行います。
この機能を実装するには、サーバーサイドプラグインを作成すればOKです。
サーバーのみで実行したいプラグインファイルには.serverをファイル名に付けます。
「plugins」直下に
plugins/init.server.ts
import { redirectCheckoutQuery } from '~/plugins/shopify/redirect-checkout-query'
import { useShopifyStore } from '~/store/shopify'

// サーバーサイドで実行するアプリの初期化処理
export default defineNuxtPlugin(async (nuxtApp) => {
  console.log('plugins/init.server.ts')

  const shopifyStore = useShopifyStore()

  await Promise.all([
    // checkout queryへのリダイレクト
    redirectCheckoutQuery(nuxtApp),
    // Shopify商品一覧の取得
    shopifyStore.serverOnGetProducts()
  ])
})
Promise.all... 非同期処理を完全に終了して次の処理へ移るようにしている。プラグイン内の非同期処理はPromise.allで実行しないと正しく動かなかった。
Nuxt3のprovideを使用する
Checkout IDをリンクに付与するアプリ共通メソッドを作成します。
共通メソッドは、Nuxt2ではinjectを使用していましたが、Nuxt3ではprovideに登録します。
「plugins」ディレクトリに
plugins/my-plugin.ts
class MyPlugin {
  // URLクエリがついたリンクを生成する
  addQueryLink (to: { name: string, params?: {} }) {
    const currentRoute = useRoute()
    const query = currentRoute.query
    const toQueryLink = Object.assign(to, { query })

    return toQueryLink
  }
}

export default defineNuxtPlugin(_nuxtApp => {
  console.log('plugins/my-plugin.ts')

  return {
    provide: {
      my: new MyPlugin
    }
  }
})
provideの登録
provideへの登録は、任意のプロパティ名に関数や値を指定します。
上記のようにクラスを指定することも可能です。
export default defineNuxtPlugin(_nuxtApp => {
  return {
    provide: {
      hello: (name) => `Hello ${name}!`
    }
  }
})
defineNuxtPlugin内以外でもuseNuxtApp()から登録することも可能です。
const nuxtApp = useNuxtApp()
nuxtApp.provide('hello', (name) => `Hello ${name}!`)
provideの呼び出し
provideへ登録するとuseNuxtApp()から呼び出せるようになります。
この時、呼び出しプロパティには$をつける必要があります。
pages/products/index.vue
<script setup lang="ts">
  const { $hello } = useNuxtApp()
  console.log($hello('name'))
  // => Hello name!
</script>
以上で全ての機能が実装できました。
商品一覧を表示する
商品一覧ページは「pages/products」以下の
shopify-v1/pages/products/index.vue
<template>
  <NuxtLayout>
    <ul
      v-for="(product, i) in products"
      :key="`product-${i}`"
    >
      <li>
        <NuxtLink
          :to="$my.addQueryLink({ name: 'products-id', params: { id: product.id } })"
        >
          {{ product.title }}
          {{ product.variants[0].price }}円
        </NuxtLink>

        <ul>
          <li>
            ID: {{ product.id }}
          </li>
          <li>
            Keys: {{ Object.keys(product) }}
          </li>
          <!-- <li>
            variants: {{ product.variants }}
          </li> -->
          <li
            v-for="(image, imageI) in product.images"
            :key="`image-${imageI}`"
            :style="{ display: 'inline-block', marginRight: '.5rem' }"
          >
            <img
              :src="image.src"
              :alt="`${product.title}-${imageI}`"
              :width="image.width / 20"
              :height="image.height / 20"
            />
          </li>

          <li
            v-html="(product.descriptionHtml)"
          />
        </ul>
      </li>
    </ul>
  </NuxtLayout>
</template>

<script setup lang="ts">
  import { useShopifyStore } from '~/store/shopify'
  const { $my } = useNuxtApp()
  const products = useShopifyStore().products
</script>
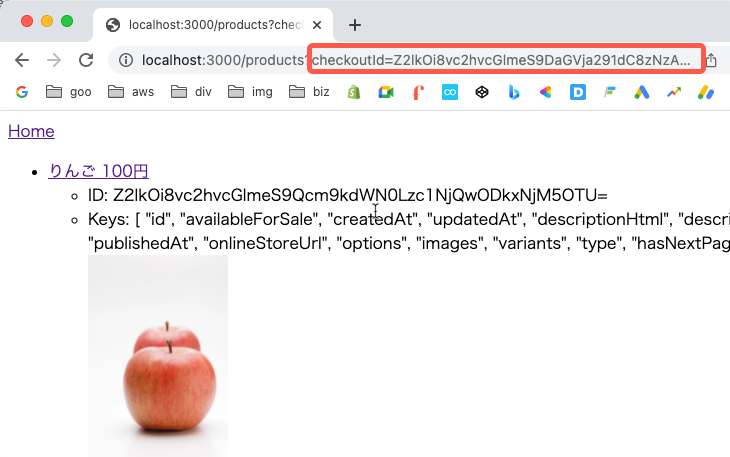
/productsにアクセスすると商品一覧が表示され、Checkout IDクエリにがついたURLになっています。

商品コンテンツを表示する
商品コンテンツを表示するページは、「pages/products」以下の
pages/products/[id].vue
<template>
  <NuxtLayout>
    <NuxtLink
      :to="$my.addQueryLink({ name: 'products'})"
    >
      products
    </NuxtLink>

    <template v-if="product">
      <ul>
        <li>
          {{ product.title }}
          {{ product.variants[0].price }}円

          <ul>
            <li>
              ID: {{ product.id }}
            </li>
            <li
              v-for="(image, imageI) in product.images"
              :key="`image-${imageI}`"
              :style="{ display: 'inline-block', marginRight: '.5rem' }"
            >
              <img
                :src="image.src"
                :alt="`${product.title}-${imageI}`"
                :width="image.width / 20"
                :height="image.height / 20"
              />
            </li>

            <li
              v-html="(product.descriptionHtml)"
            />
          </ul>
        </li>
      </ul>
    </template>

    <template v-else>
      <p>商品は見つかりませんでした。</p>
    </template>
  </NuxtLayout>
</template>

<script setup lang="ts">
  import { useShopifyStore } from '~/store/shopify'

  const { $my } = useNuxtApp()
  const route = useRoute()

  const product = useShopifyStore().products
    .find(product => product.id === route.params.id)
</script>
useShopifyStore().products.find()... アプリが呼ばれたと同時にPiniaに商品一覧を保存しているので、パラメーターと一致する商品をfind()メソッドで取得している。
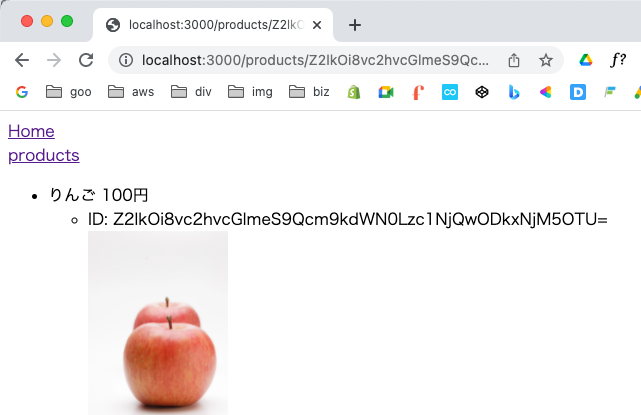
/products/<商品ID>へアクセスしてください。
APIリクエストを飛ばすより、ページ遷移が高速になったと思います。

以上で実装は完了です。
Piniaを導入した商品取得のベストプラクティス
ECサイトやブログサイトなど、コンテンツを取得するAPIはユーザーがサイトに訪れた最初の一回のみ行うことで、APIの回数を減らすことができます。
APIを毎回リクエストするより、JSで検索する方がより高速に行えるのでユーザーを待たせません。
今回はコンテンツの保管先にPiniaを導入しましたが、もちろんVuexでも構いません。ここはお好みで。
以上がNuxt3でのコンテンツ取得のベストプラクティスの実装でした。